The 13th Colossus is one of sixteen bosses fought in Shadow of the Colossus. Located in the middle of a large desert at quadrant E6. Despite its massive appearance, it is completely docile and will in no way deliberately assault Wander.
By far the largest colossus in the game, it is over twice the length of the 7th and 10th colossi. To put its sheer size into perspective, each of its wings are over 60ft long, with the rear-half of the colossus' back matching the width of a four-lane highway.
However, despite this, the 13th is also the most peaceful of all the colossi that Wander fights. It does not try to attack him regardless of what he does. It does not even pay him any mind unless Wander climbs onto its back.
Path to the colossus[]
- See also: Map for this path

The 13th colossus is located in a great desert to the southwest of the Shrine of Worship. Proceed south past the mountain where the 1st colossus dwelt until the Southern Plains have been reached. Turn west and continue until the terrain turns into a desert. Cross the platform to awaken the 13th colossus. Another way is that the player can proceed to the west and through the Autumn Forest to come out to the desert quicker and closer to the platform.
Walkthrough[]

Unlike the 5th colossus, which keeps airborne by flapping its massive wings, the 13th colossus uses its small wings to merely steer itself. Its gigantic bulk is kept aloft by three series of gas bladders located at its front, middle, and posterior.
The colossus will remain airborne, circling its desert home, until Wander brings it down. Aim the bow at one of the gas bladders and pull back until the charge meter is completely filled, which will ensure that the arrow flies faster at the target. Lead the target very slightly and release the arrow. If a sac is hit, it will deflate and turn a dim color. Once all three have been pierced, the colossus will no longer be able to remain high in the sky and will swoop down low to the ground. Even at its slowest, the colossus is still far too fast to reach on foot. Agro may help to chase it down.
Its four front wings will be lowered such that they skim the surface of the desert. Ride up next to one and jump off of Agro's back. The ridges in the wings can be climbed like a wall. Eventually, the colossus will recover and rise back into the air so Wander can jump the gap over onto its back and then run along the length of its body until reaching a raised dorsal ridge. There are three located along its length, and there is a sigil located under each. Stab the sigil with fully-charged sword strikes.
During this time, the colossus will try to shake the nuisance off its back. It will squirm whenever the sigil is struck, perform a barrel roll, and even dive into the desert when these two moves fail to dislodge Wander. The signal that the third is about to occur is when the flap closes down upon the sigil. When it dives into the desert sands, simply jump off to reduce the amount of damage taken.
After a moment, the 13th colossus will burst from the sand, its gas bladders healed. Repeat the procedure until it is brought down for good.
- Time Attack times (Normal, Hard): 12:00, 13:00
- Time Attack times in PS4 Remake (Normal, Hard): 12:00, 10:15
Weakspots[]
| Location | Percentage of health | |
|---|---|---|
| Normal | Hard | |
| On top, under the front fin | 33.3% | 33.3% |
| On top, under the middle fin | 33.3% | 33.3% |
| On top, under the back fin | 33.3% | 33.3% |
| Gas bladders (3) | Used in climbing | |
Tips & tricks[]
- Regardless of the difficulty setting, the player can, with a bit of skill and good timing, destroy two if not all three of the sigils located on the colossus in a single run. There are two methods, and one involves pure speed. The other one will be explained here:
- Shoot all three sacs and climb the colossus as normal.
- Once on the colossus' back, make your way to the first sigil. Here you want to do one fully-charged stab and one 90% stab (two full stabs and one 75% stab on hard). You can see how much damage your stab will do by looking at the grip meter. A 90% stab is just before the charge reaches max power.
- If done correctly, you will have done the necessary damage to that sigil (one third of max health), while preventing the colossus from barrel rolling.
- Repeat the same process on the rest of the sigils and you should have successfully defeated the colossus in one run.
- Utilize the environment. Unlike some colossi, the 13th is in a wide, generally flat expanse of sandy terrain complete with windswept sand and sunlight reflecting rather brightly. This is useful since Wander's sword gathers light and focuses it in the general direction of a colossus' sigils. This is most useful against the 13th colossus because it not only eliminates all the glare, but, when it is underground, can be used to track the colossus down. Riding after the colossus, the player will note that eventually Agro will be able to stand just over the point where the sword focuses the light.
- Also, while not as accurate as the sword, holding down the
 trigger will make Wander automatically look at the colossus. This is useful because the player can still move and use the bow while still looking directly at it.
 - Back up. The 13th colossus will eventually burst out of this spot, notably damaging Wander if he is struck, but also revealing the freshly reformed air bladders. Practically at eye level and moving at their slowest, this is the perfect time to simply puncture them one after the other. The result is that the colossus will drop its wings as soon as it is out of the ground, removing the need to chase it and compensating for any previously lost time.
- Also, while not as accurate as the sword, holding down the
Attacks[]
| Attack | Damage (Normal) | Damage (Hard) | Description | Demonstration |
|---|---|---|---|---|
| Burrow | 10+ | 20+ | Although it may not be considered an attack, the player still suffers damage when it occurs. After a while, the colossus will begin to burrow underground, get off of it before colliding. | 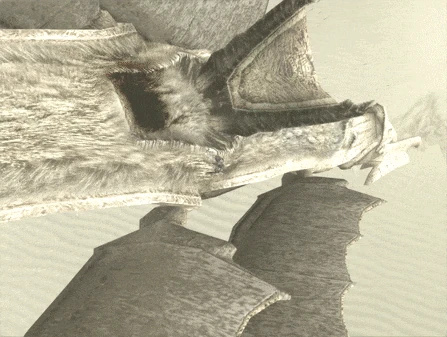
|
Music[]
| Phase | Plays in | Music |
|---|---|---|
| Phase 1 | Plays while the colossus flies around the desert. | Silence |
| Phase 2 | Plays after all three gas bladders have been shot and it lowers its front wings to the ground. | In Awe of the Power |
| Phase 3 | Plays once the colossus raises its wings back up and Wander has climbed up onto its back. | Counterattack |
Trivia[]
General[]
- This is the third of three limbless, serpentine colossi the player faces over the course of the game, the other two being the 7th and 10th colossi.
- This is one of the two colossi that can fly.
- This is the only colossus that will never attack Wander or Agro, making it the most serene of all the colossi. Interestingly, the second most peaceful colossus is the only other one that can fly, the 5th.
- Along with the 10th colossus, the 13th is the only colossus that can be called subterranean, as they both burrow beneath sand.
- This is the longest of all the colossi.
- This is one of the three colossi that require the player to use Agro in order to defeat it, and one of only five that Agro is actually capable of reaching.
- This is the only colossus that is able to conceal and protect its major sigils by covering it with a folding flap of skin.
- The 13th colossus has possibly the most unique vocal sounds of all the colossi; while it makes the usual deep bellowing sounds that all the colossi make, during its introductory and death sequences, it makes an unusual high-pitched wailing sound.
- The 13th colossus has the longest death sequence of all the colossi; it lasts roughly 26 seconds.
- The 13th colossus has three eyes: One on its right side and two on its left. This can be seen clearly in the screenshots below.
- This is one of only two colossi who has three major sigils in Normal Mode. The 5th is the other. The 7th and 16th colossi each have three minor sigils, but not three major.
- If the player is in the right spot and the arrow is aimed in the correct place while riding towards the desert, the screen will show a single frame of the 13th colossus bursting out of the ground thanks to a glitch.
- The 13th colossus' Hard Time Attack goal is the biggest change among all the other Hard Time Attack goals, with a decrease of 2 minutes and 45 seconds.
- Agro can get stuck on one of the 13th colossus' skin flaps and be taken into the air if the colossus is beneath Agro while emerging from the sand.
- The 13th colossus' idol texture features a wing not seen on the model, possibly cut due to the idol housing added late in development causing clipping issues with said wing.
Earlier versions[]
- An early sketch of a colossus called "Snake" was first thought to have belonged to the 7th colossus or another type of it. However, besides the obvious which is the name being the 13th colossus' developer-given name, the textures of the 13th colossus have textures named "uroko" (fish scales). There's also a text in the sketch which reads as "more like an eel?", seemingly being made that way unintentionally.
- Several different models of the 13th colossus are seen in various early footage and screenshots of the game. They are all listed below:
- Snake A: The first model of the 13th colossus, existing only in the first period of the game. It is seen in the Production Reel from the Nico bonus DVD for a few seconds.[1] A few sketches seen in the gallery resemble it a bit, but it's unknown what the head looked like as it isn't shown. This version came in and out of the sand, flying and burrowing itself seemingly most of the time.
- Snake B: Seen in one of the early screenshots of the 13th colossus and in the Production Reel,[1] this version is more agressive-looking, with red marks and with a head resembling that of its final version, though more meaner looking. The fins of this model had a tendon muscle that needed to be cut using the sword, which can be seen in the footage and in a sketch. This model existed from the second to third periods from the first major era of the game.
- Snake C Ver. 1: By around the period with the parts library map, the colossus' model was already known as "Snake C". This version is barely seen in the Production Reel footage, with only a small part of the boss being seen.[1] It had way more ruins on top of its model, and its marks were changed from red to orange. A collision model with ruins removed similar to this version is in the Athretic Test Stage.
- Snake C Ver. 2: Seen in various trailers and promotional screenshots from 2004,[2][3][4] this version existed throughout the second major era of the game. It is the one with the centipede legs underneath and electric weakpoints.
- Snake C Ver. 3: The final model of this colossus, changed somewhere between the reduction and the arms periods from the third major era of the game. Its electric weakpoints were changed for air sacks and the centipede legs were removed completely. Its "Snake C" textures were also changed (seemingly) back to "Snake A" textures.
- This was the 7th colossus in the E3 Demo version. Its flaps had no skin and its fur was colored gray. Its battle themes were 'In Awe of the Power' while Wander was on the ground and 'Counterattack' while on top of it. 'Silence' only played while the colossus was underground.
- In the Preview and E3 Demo versions of the game, the 13th colossus' battle was a little different; as soon as a sigil was done the flap would close immediately. It would also not do a barrel roll at any point. The period in which you could fly on top of the colossus was timed just like on the 7th's fight, meaning you could take out all three sigils without aiming to speedrun. This reflects its fight order in earlier versions of the game (7th).
- As seen in early footage and listed in the data sheets, the 13th colossus had a unique HUD icon, which is an icon in the shape of the colossus that used to show the weakpoint locations in early builds. The name listed is "Snake_B", which means the icon took the appearance of that iteration.
- In the Preview and E3 Demo versions of the game, the 13th colossus' battle was a little different; as soon as a sigil was done the flap would close immediately. It would also not do a barrel roll at any point. The period in which you could fly on top of the colossus was timed just like on the 7th's fight, meaning you could take out all three sigils without aiming to speedrun. This reflects its fight order in earlier versions of the game (7th).
Gallery[]
Original[]
")
")
")
")
")
")
")
")
")
")
")
")
")
")
")
Remake[]
")
")
")
")
")
")
Earlier versions[]
")
")
")
")
")
")
")
")
")
")
")
")
")
")
")
")
")
")
")
")
")
References[]
- ↑ 1.0 1.1 1.2 https://www.youtube.com/watch?v=QsQ50jIvEg4 | Production Reel.
- ↑ https://www.youtube.com/watch?v=V62bwg5Arc8 | August 2004 promo footage.
- ↑ https://www.youtube.com/watch?v=MBAG2O1aNfE | TGS 2004 trailer.
- ↑ https://www.youtube.com/watch?v=wkoFDDvHDJE | Europe E3 2005 trailer.
| The game | ICO ( Demo · Revisions from U.S. version · Ico HD ) | |
| Characters | Ico · Yorda · The Queen · Shadows · Shinkan | |
| The Castle | Idol Gates · Yorda's language · Saving Benches Altar • Warehouse • Spiral Stairs • Old Bridge • Stairs • Trolley 1 • Trolley 2 • Crane • Chandelier • Drawbridge • Main Gate • Graveyard • Dark Room • Sunbeams • Stone Pillar • East Crag • East Arena • East Idol Stairs • East Reflector • Waterfall • Sluice • Cogwheel • Gondola • Water Tower • West Crag • West Arena • West Idol Stairs • West Reflector • Cage • Pipe • Elevator • Wharf • Queen's Room • Sandy Beach | |
| Other Media | Ico ~Melody in the Mist~ · Official Game Guide · Ico: Castle in the Mist | |
 Walkthrough Walkthrough | |
|---|---|
| Characters | Wander · Mono · Agro · Dormin · Lord Emon · Guards · Shadows |
| Colossi | I · II · III · IV · V · VI · VII · VIII · IX · X · XI · XII · XIII · XIV · XV · XVI |
| Locations | The Forbidden Lands · Shrine of Worship · Colossus Arenas |
| Main Items | Power-ups (Lizards · Fruit) · Weapons (Ancient Sword · Sword of the Sun · Queen’s Sword · Sword of Dormin · Bow & Arrow · Ancient Bow · Harpoon of Thunder · Life Sword) · Collectibles (Relics) |
| Gameplay | Hard Mode · Save shrines · Time Attack · Reminiscence Mode · Watermellon · Barrel |
| Media | Roar of the Earth (OST) · Official Art and Guide Book · Nico Bonus DVD · Film · Interview Archive |
| Releases | OPM Demo · PS2 original · PS3 remaster · PS4 remake · Credits |
| Early Builds | Preview version · PSU Preview version · E3 Demo |
| Unused Content | Unused Colossi · Colossus Test Stages · Unused Locations · Beta Mountains · Development Timeline of Shadow of the Colossus |